turn drawing into 3d gif
A GIF, or "Graphics Interchange Format", is a compressed image file format that allows for blitheness. In that location are many ways to create a GIF, only Photoshop is fast and like shooting fish in a barrel, with congenital-in tools for prototype manipulation and animating.
Just similar classic animation, an animated GIF is fabricated upwardly of a series of nonetheless images played sequentially to create the illusion of movement. Find a GIF off the internet and drag information technology into Photoshop, and you volition see the separate frames that brand upward the animation. These frames are what we're going to build in this tutorial in society to animate a killer banner advertising GIF.

Without farther ado, here's how to make an animated GIF in Photoshop.
Step 1: Gear up the dimensions and resolution of your Photoshop document
—
Fix your document ahead of time. Even if your just appetite is to create a shareable GIF for your friends on social media, letting the size of your photos or video dictate the size of your certificate might make the file larger than you demand it to be, which translates into a poor quality GIF. In full general, somewhere in the region of 600px-800px is fine for a square image.
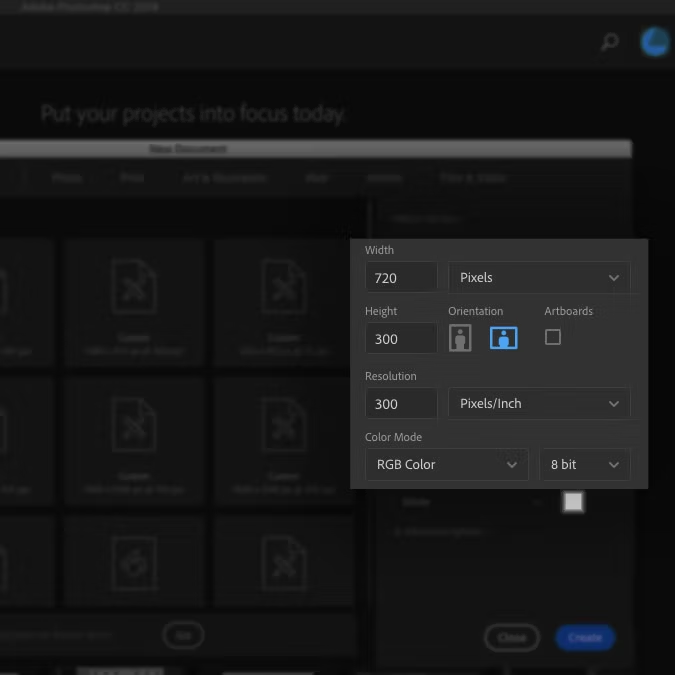
Dimensions
For this project, nosotros are working with a banner ad GIF, which has standard sizing guidelines. I chose the 720×300 layout. Make sure your units are in pixels.
Resolution
To go along the file size as low equally possible, a resolution of 150 is fine. I went with 300 since I know my GIF isn't going to be that large. Make certain your units are in Pixels/inch.
Color mode
Finally, blithe GIFs are made for the screen, and then set your color mode to RGB color. Printing Create to open your new document.
Footstep ii: Import your paradigm files into Photoshop
—
Making a GIF from still images
Become to File > Scripts > Load Files into Stack and select the Browse push in the Load Layers window that comes upwardly. This brings up the Finder/Explorer window where you can browse for your files and select all of the ones y'all demand. When you're finished, click Open and then OK in the side by side window. The files will be imported into a separate certificate, from which y'all can select all layers and elevate them into your working document.
Making a GIF from video
If yous are converting a video into a GIF, go to File > Import > Video Frames to Layers.
Step three: Open the timeline window
—
Become to Window > Timeline. This will open up a panel in the lower third of the canvas. In the center of the panel, click on the pointer to open the dropdown menu, and select Create Frame Animation.
Footstep 4: Catechumen your layers into frames
—

Your outset frame will already be set upward, made of all of the visible layers (significant the layer visibility, or heart icon, is switched on) in your document. Now all you have to practice is fill the Timeline with multiple frames to simulate movement. There are two ways to do this: import frames you have already prepared or create your animation from scratch in Photoshop. This section will cover the beginning scenario.
If you take already gear up up still, sequential images ahead of time (or are working from imported video frames, come across Step 2), click on the hamburger menu icon in the upper right corner of the Timeline panel. Select Make Frames From Layers. You lot will see the timeline populate with frames from your layers.
Step 5: Indistinguishable frames to create your animation
—

If you take not set upwards the still images ahead of time or need to suit parts of the animation y'all created in Step iv, you tin can create the animation manually frame by frame (which is how I made my animation). To do this, indistinguishable the last frame in the timeline (click on the earmarked page icon in the tools panel beneath the timeline), make the changes you need to make on your image, and repeat.
For example, my animation is a pair of sunglasses sliding downward over the discipline'south eyes. To practice this, I duplicated the frame, moved the sunglasses down a few pixels (how many pixels was a matter of trial and error—more on that later), and repeated this process until I had about fifteen frames and the sunglasses were where I wanted them, resulting in smooth downward glide animation.

Footstep 6: Set up the delay time of each frame
—
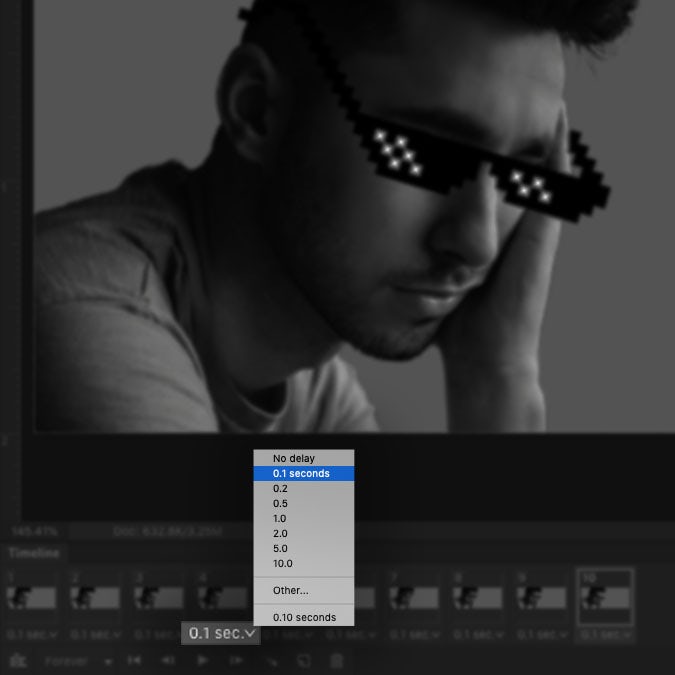
Y'all can discover the filibuster timer at the bottom of each frame (the fourth dimension in seconds with a dropdown arrow next to it).
Click the arrow to bring upwards the menu and choose the corporeality of time you desire the frame to display on screen.
You tin can fix the elapsing of individual frames or multiple frames at once by selecting all of the frames you need and using the dropdown menu for one of them.
Tip: Many frames with short delays is the key to smooth animations whereas few frames with long delays creates a jerky, stop-motion effect.
Step 7: Set the number of times the animation will loop
—
Too located in the tools panel beneath the timeline is the loop setting. You can set your animation to loop Forever, Once, or a specific number of times.
Step 8: Preview and iterate on your animation
—
The play button in the timeline window's tool panel allows you to preview your animation. Utilise this to make certain that your animation is believable and behaving as information technology should. If it isn't, endeavour tinkering around with delay or adding more than frames until you get the results that you want. Conversely, this is besides a great fourth dimension to experiment with removing as many frames as you can without breaking the illusion of motion in order to get the everyman file size possible.
Step 9: Consign your Photoshop certificate as a GIF
—

First of all, don't forget to save your working PSD!
Once you're gear up to export your terminal GIF, get to File > Export > Save for Web (Legacy). (Notation: if you are working with an older version of Photoshop, it will probable exist File > Salvage for Web & Devices). This volition bring upwards the export window.
There are a lot of options here, but nosotros simply demand a handful for our purposes. First, make sure you set the file type to GIF in the dropdown box in the upper right. The rest of the options I've highlighted in the image below are optional but helpful for producing a lightweight file. Let's walk through them now.
Trim the file size
Your main goal with the remaining options is to go along your file size low by decreasing the amount of details in your GIF without sacrificing image quality. Remember that a large file size means a slow load time, which tin be especially punishing for marketing purposes like imprint ads, where the viewer wasn't looking for your content and won't exist waiting around for it to load. Aim to stay beneath 1MB. Upwards to 5MB is achievable on nigh websites but pushing it. You can see your GIF's file size in the bottom left corner of panel containing the preview image.
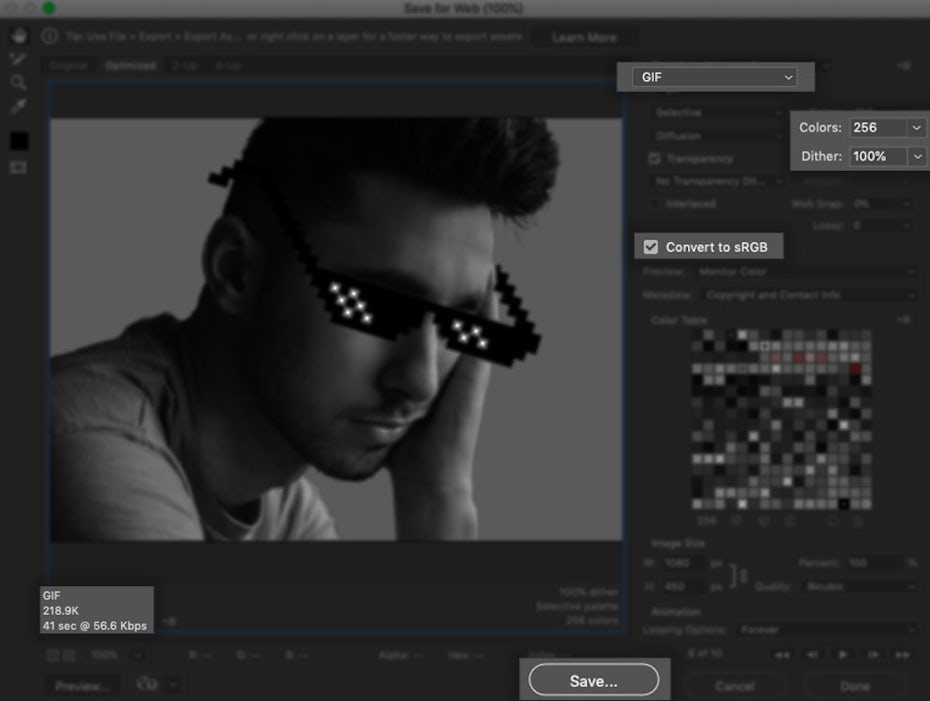
Reduce the color data
Unnecessary color information is the biggest culprit when it comes to a big file size. To cut it down, suit the total number of colors in the dropdown box labeled "Colors:" and reduce the dither (the blending of pixels to create seamless shading) setting beneath it. Equally you brand changes, keep an eye on the preview epitome of your GIF on the left side to see how the resolution is being affected.
Catechumen to sRGB
sRGB, or "Standard RGB," has a narrower range of colors than the default "Adobe RGB," so brand sure to bank check that box.
Salvage
Once you're happy with your resolution and file size, hit the save button at the bottom of the window. To make certain that everything came out alright, you lot can preview the finished GIF file by dragging it into a browser's URL box.
Step 10: Share your finished Photoshop GIF!
—
And there you have information technology—your finished GIF, ready to be shared all beyond the www. Now that y'all accept the skills to create basic Photoshop animations from videos and yet images, y'all can gifify well-nigh annihilation!
While this method is useful for quick, fun GIFs, GIFs for professional person purposes should be a lot more robust than my silly sunglasses ad. Learning the software is straightforward, but blitheness itself is a tricky art form that takes practice and expertise. When you're gear up to upwardly your GIF game, make sure you're working with a professional person.
Looking for professional assist creating an blitheness?
Work with one of our talented designers!
This article was originally written past Rebecca Creger and published in 2013. It's been updated with new data and examples.
Source: https://99designs.com/blog/design-tutorials/create-a-gif-in-photoshop/
Post a Comment for "turn drawing into 3d gif"